


Growing up, my family and I had dinner together every Shabbat – a holiday observed by Jewish people every Friday night. No matter what was going on in everyone's lives, we always made sure we were home for Shabbat dinner. Part of it had to do with tradition and being with family. But the other part had to do with my mom's cooking. It. Is. The. Best.
Without a doubt, my two favorite parts of Shabbat dinners were always her chicken noodle soup (I could probably eat this every day and never get sick of it) and her homemade challah bread.
My mom was kind enough to share this delicious recipe with me. What I love about it is that it's so versatile. She will often use the same dough recipe to make:
- The best challah bread, of course
- Cinnamon rolls
- Garlic knots
- Dinner rolls
- Challah French toast
- And so many other baked goodies!
I'm so excited to share this recipe with you all. My favorite is to take the leftover Challah bread from Friday night dinners and make a yummy stuffed Challah French toast recipe.
Favorite toppings:
- Sesame seeds (my all-time favorite)
- Poppy seeds
- Everything but the bagel spice
Blooming Your Yeast
This recipe calls for active dry yeast. This means that you'll want to bloom the yeast (by placing in a bowl with warm water + sugar) to make sure the yeast is still alive. You can do this by placing the yeast in a bowl with warm water and sugar, then waiting 5-7 minutes. If there's a foamy layer on top, then that means your yeast is alive and good to go.
My mom always recommends keeping yeast in the refrigerator or freezer to keep it alive longer. Even if you've passed the expiration date, don't worry. Just bloom it to make sure it's alive.
If you don’t have access to active dry yeast, you can also use instant yeast. The only difference is that you won’t have to bloom your yeast to make sure it’s alive and active. Simply place everything in the mixing bowl (or if kneading by hand, bowl) and mix together.

This recipe calls for 2 packets of Active Dry Yeast, which is the equivalent to 4½ teaspoons.
Various Ways to Proof Your Dough
- Oven with light on
- Instant Pot
- Warm spot in the kitchen/house
Ideally, your dough should roughly double from the time you form the dough to the time you punch it down and start forming it into whatever shape you prefer. Once you've shaped your dough, let it proof a second time by resting it for 30 minutes before baking. Then you follow up with an egg wash and let it bake.
Freezing and Reheating Challah
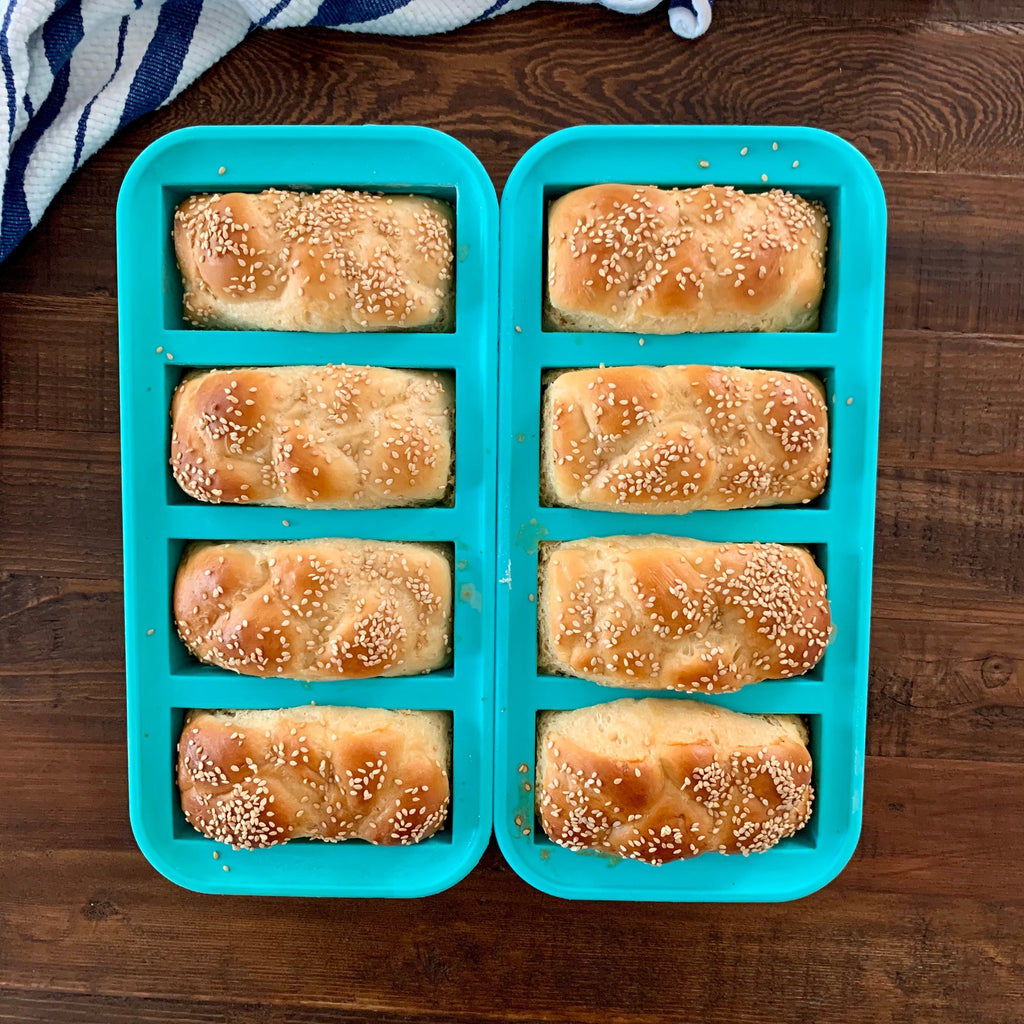
Because Jake and I live by ourselves, it's a bit hard to go through all the challah bread quickly enough. My mom mentioned to me I should use our Souper Cubes® trays to bake smaller loaves of challah bread so we can take out just enough for dinner. I wish I thought of this on my own. Previously, I was baking two larger challah loaves on a baking sheet and trying to go through it quickly enough.
When you are ready to enjoy challah that was previouslyy frozen, let it thaw on the counter or microwave in 20-second bursts. If I'm using the 1-cup trays, I often slice it into thirds and then toast it for breakfast.

Baking in Souper Cubes®
When I'm placing the dough in the Souper Cubes® trays, I try to have it only fill up to about the half-way point as it will continue to rise in the oven as it’s baking.

I recommend baking in your 1-cup or 2-cup Souper Cubes® trays and letting cool completely before taking the loaves out. Once cool, I flip the trays upside down overr a clean counter or cutting board and gently push on the bottom of each well so that the loaves pop out.
How To Make Our Special Family Challah Bread
Gather and Prep All of Your Ingredients
If you’d like a challah that is even more yellow in color, you can add an extra egg yolk to the recipe.

Bloom Your Yeast
This step requires warm water, sugar, and yeast. Make sure your water isn't too hot as it can kill the yeast. If I’m using active dry yeast, I typically wait about 5 minutes to confirm the yeast is alive. If you’re using instant yeast, you can skip this step.

Transfer yeasted water to a bowl and add warm water, sugar, eggs, salt, and flour.

Mix together with dough hook for 3-5 minutes on a low speed
I prefer to use my KitchenAid stand mixer, but you can also knead using your hands on a slightly floured counter. If you are going to use a stand mixture, then I recommend using the dough hook and mixing on a low speed.

Slowly mix in the oil and mix dough for 3-5 minutes
If you’re kneading by hand, make sure to mix the dough together until it no longer sticks to the counter or board you’re kneading on.
If the dough seems too wet and sticky, add a few tablespoons of all-purpose flour. Add no more than an additional cup of all-purpose flour.

Once the dough is ready, transfer to a large bowl and let rest until doubled in size. Then punch down and knead by hand for 1 minute.
For this step, you’ll want to form your dough into a ball and place in a large bowl. To make sure the dough doesn’t stick to the bowl, you can spread some vegetable oil or flour along it. Then cover with plastic wrap or a towel and place in a warm spot.
Typically, it takes me about 90 minutes for the dough to double in size.

Divide into Pieces and Braid.
For this recipe, I made 6 mini challahs (in my 1-cup trays), 3 mini cinnamon rolls, and 1 medium challah (round-shaped). You can also make 2 large challahs if you prefer. Or entirely small challahs.
To make sure the strands are similar in weight (without using a scale), use a pastry cutter or knife to cut in even parts. I typically keep cutting pieces in half until I have enough pieces to form the challahs.

Rest for 30 Minutes (Final Proof).
This will be your second and final proof.

It's not included in the above picture, but I also made a medium-sized round challah from this recipe.
Add Egg Wash and Preferred Topping.
For the egg wash, I whisked 1 egg and ¼ cup of water together. Then lightly and gently brushed over the challah. I topped our challah with sesame seeds.
For our cinnamon rolls, I used sugar, butter, and cinnamon. Then once baked, I added a cream cheese frosting. You can also add pecans to the cinnamon rolls to make it extra yummy.

Bake in a 350F Oven Until Golden Brown.
In our oven, this took about 25 minutes. Depending on your oven, this might take up to 30 minutes. After 25 minutes, check every minute to make sure the bread doesn’t burn.

Let cool completely before removing from trays.


We would love to hear your ideas or better yet, post a photo of your cubes organized in our Freezer Meals & Recipes Facebook Group!