


Introduction
If you’ve been searching for a chili that bridges the gap between summer bounty and a hearty meal, this easy vegetarian chili is the answer. This is a recipe we make on repeat and is guaranteed to be the absolute perfect texture. It’s the perfect way to capture your garden’s harvest by using zucchini & summer squash, crisp carrots, sweet bell peppers, fresh corn, and cilantro. This cooks up to a thick, robust, meatless chili that tastes like it simmered all day, yet comes together in just about 40 minutes.
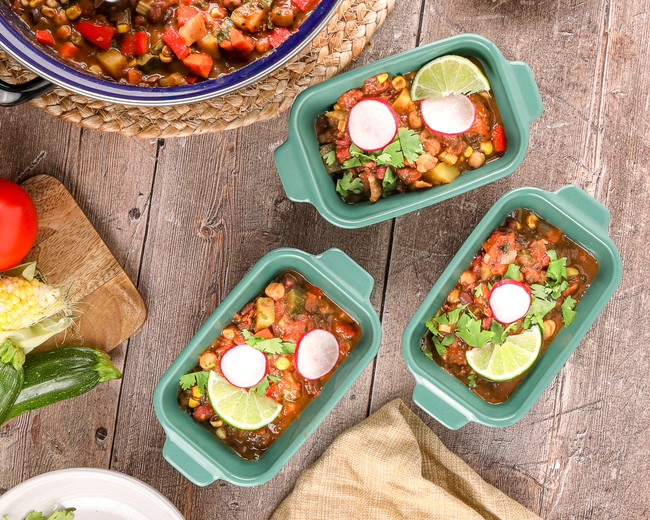
The secret star ingredient here is a combination of fire-roasted tomatoes and fresh zucchini, which gives this three bean chili a vibrant, smoky depth perfect for warm-weather batch cooking. It is specifically designed to be portioned and frozen in individual servings, making it the ultimate freezer-friendly dinner to pull out on a busy weeknight. Top it with chopped cilantro, squeeze of lime, and pickled radishes and you have a bright, satisfying summer vegetable chili.
Why You Will Love This Easy Three-Bean Vegetable Chili (Vegetarian, Freezer-Friendly)
Combination of Three Beans
Instead of relying on just one type of bean, this recipe uses a trio of black beans, kidney beans, and chickpeas. The combination ensures every single spoonful has a great mix of beans. The great news is that you can substitute any type of bean based on your preference or what you have on hand. Just be sure for the best results you add a variety.
Tons of Texture
This chili screams variety and texture thanks to five vegetables, three types of beans, and corn. Finely chopping the vegetables into a uniform size helps them retain their distinct shape and bite without turning into mush during the cooking or freezing process. Keeping them the same size allows them to cook at the same time and for the chili to look visually pleasing.
Garden-Fresh Summer Vegetables
This vegetable chili recipe celebrates the best of the season. It’s a fantastic way to utilize an abundance of garden zucchini, bell peppers, and fresh corn, bringing a natural sweetness to balance the smoky spices.
Make a Batch & Freeze
This is the ultimate make-ahead chili. It freezes beautifully because beans and hearty vegetables hold their integrity perfectly through the freezing and thawing cycle, meaning you get a fresh-cooked experience with minimal effort.

Key Ingredients & Substitutions
Three Bean Mix
Combining black beans, kidney beans, and chickpeas provides excellent textural contrast and visual appeal. If you are short on one, you can easily swap it out for whatever you have in the pantry. Or if you like pinto beans use those instead. You can certainly use dried beans first, just soak and cook before adding to the chili.
Fire Roasted Tomatoes
Using canned fire-roasted tomatoes instead of standard diced tomatoes adds an instant, complex, smoky depth to the veggie chili base without requiring hours on the stovetop. If you only have diced tomatoes, you can swap them in. Or if you only have whole tomatoes, just break up into smaller pieces first before adding to the pot.
Lime & Cilantro
Never underestimate the power of adding an acid to the pot. This freshly squeezed lime juice and chopped cilantro wake up the earthy spices and elevate this vegetarian chili with beans. You can also add a bit more right before serving to brighten it up.
Step-by-Step Instructions

1. Sauté the Vegetables
Heat 2 tablespoons of olive oil in a large pot or Dutch oven over medium-high heat. Add the chopped yellow onion, carrot, and celery and cook for 4 minutes until softened.

2. Bloom the Spices
Add the red bell pepper, minced garlic, chili powder, coriander, cumin, oregano, salt, and pepper.
Pro tip: Let the spices cook directly in the hot oil and vegetables for about 1 minute before adding liquid. This "blooms" the spices, releasing their fat-soluble flavor compounds and building a much deeper foundation for your vegan chili.

3. Add Liquids and Beans
Stir in the zucchini, fire-roasted tomatoes, broth, drained and rinsed black beans, kidney beans, chickpeas, and fresh corn. Be sure to scrape up the bottom with a wooden spoon to get all the brown bits of flavor.

4. Simmer to Perfection
Bring the mixture to a simmer, then turn the heat down to low. Cover the pot and let it cook for 20 minutes, allowing the vegetables to tenderize and the flavors to marry beautifully. Stir in fresh cilantro, and lime juice in the final few minutes of cooking.
Success Tips for Easy Three-Bean Vegetable Chili
How to Thicken Chili
If you prefer a thicker texture, simply leave the lid off the pot during the last 5 to 10 minutes of simmering to let the excess moisture evaporate. Alternatively, use the back of a wooden spoon or a potato masher to crush a small portion of the beans directly against the side of the pot. This releases natural starches that instantly thicken the broth without needing cornstarch or flour.
Bloom the Spices
Never dump your spices directly into the broth! Sautéing them with the vegetables and oil first toasts the spices, intensifying their aromatic qualities and eliminating any raw, chalky taste. Be careful to watch closely to avoid burning, by having all of your liquids ready to add in the next step.
Don’t Skip the Acid (Lime)
Because beans and cumin are naturally heavy and earthy, a splash of fresh lime juice right at the end acts as a flavor enhancer, cutting through the richness and making the individual vegetable flavors pop.
How to Store & Freeze Easy Three-Bean Vegetable Chili
How to Freeze Three-Bean Chili in Souper Cubes Trays
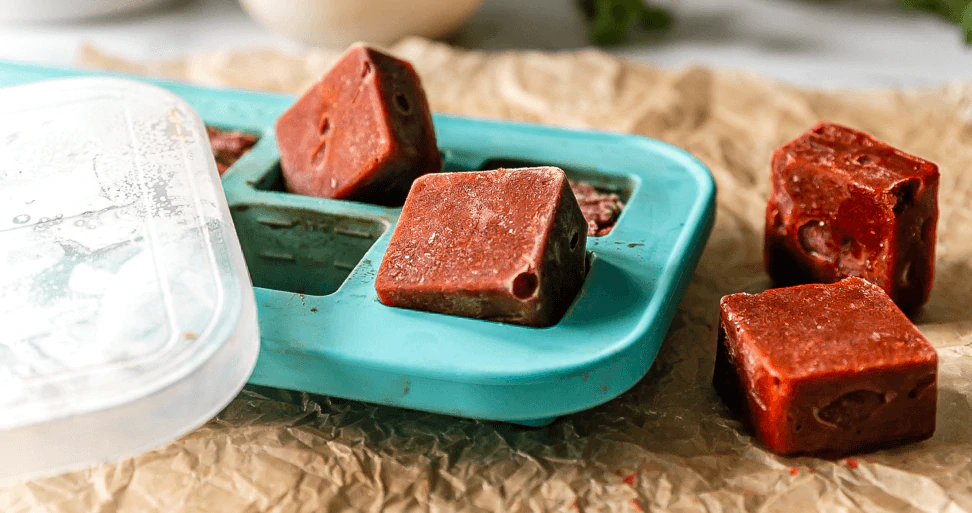
Ladle the chili directly into the wells of your Souper Cubes 1-cup freezer trays, up to the fill line. To freeze this entire batch, you’ll need two 1-cup trays, which will yield eight 1-cup portions. Let the chili cool to room temperature to avoid ice crystals and avoid heating up your freezer.

Place the lid on, label the lid with our labeling tape or water-based paint markers and set the tray flat in your freezer and leave in the freezer overnight. Once frozen you can leave chili in the trays, but then that ties up your trays for freezing other meals until you use up the chili. For more information about How to Freeze in an Upright Freezer or check out Chest Freezer Organizational Tips for all you need to know about freezing.
How to Store Easy Three-Bean Vegetable Chili

Once the chili cubes are frozen solid, let the trays sit on the kitchen counter for about 5 minutes to loosen slightly. Pop the frozen cubes out of the silicone wells.

For long-term protection against freezer burn, place the cubes into Souper Cubes vacuum seal bags or heavy-duty freezer zip bags, press out the air, seal them tight, and return them straight to the freezer. For more tips on how to vacuum seal, check out this blog.
How long does Easy Three-Bean Vegetable Chili last in the freezer?

We say 3-4 months for optimal freshness. However, as long as it has been consistently vacuum sealed bag for best results and to prevent freezer burn.
How long does Easy Three-Bean Vegetable Chili last in the refrigerator?
Store in an airtight container for up to 4 days.
How to Reheat Easy Three-Bean Vegetable Chili
How to Reheat Easy Three-Bean Vegetable Chili in the Microwave
From Thawed: Place your chili in a microwave-safe bowl or Souper Cubes 5-inch Rectangle Ceramic Baking Dish, cover with a silicone lid. Heat in the microwave on high for 2 to 3 minutes, stirring halfway through.

From Frozen: Place the frozen cube in a microwave-safe bowl or Souper Cubes 5-inch Rectangle Ceramic Baking Dish, cover with a silicone lid. Cover and heat on 50% power for 3 minutes until slightly thawed. Stir, then microwave on high for an additional 2 minutes or until steaming hot throughout.
How to Reheat Easy Three-Bean Vegetable Chili on the Stovetop

Place your frozen chili cube(s) into a small saucepan over medium-low heat. Always add a splash of water or vegetable broth (about 2 tablespoons) to create immediate steam and prevent the bottom from scorching. Cover with a lid and cook, stirring occasionally to break up the cube, for about 5 minutes until bubbling hot.
Pro Tip: Do not add cold toppings like sour cream, Greek yogurt, avocado, or fresh cheese before reheating. Heat the chili completely first, then add your cold garnishes when you are ready to serve.
FAQ
Can you use dried beans instead of canned for this Easy Chili recipe?
Yes, but you will need to soak and cook them beforehand. You will need about 1 1/2 cups cooked beans to replace each can, or a total of 4½ cups for the recipe. Make sure they are completely cooked and tender before adding them to the pot in step 3, as 20 minutes is not enough time. If you add it too early, just add a bit more water or stock and simmer a bit longer.
Can I add sweet potatoes or butternut squash to this summer chili?
Yes, this base is incredibly customizable! If you want to lean into an autumn variation, you can swap the zucchini for diced sweet potato or butternut squash. Just keep in mind that dense root vegetables take longer to cook; you will need to add the squash in step 1 with the onions instead of later, like the zucchini.
Will the zucchini or squash get mushy after freezing and reheating?
Not if you follow the directions and add the zucchini later in the steps. Also, make sure to cut the zucchini into uniform, slightly larger pieces and avoid overcooking during the initial simmer. Because Souper Cubes trays freeze your portions rapidly, they prevent large ice crystals from forming, which is the main culprit behind mushy, water-logged vegetables.
How do I prevent my chili from staining my silicone trays?
Silicone is naturally porous, and highly pigmented foods like chili powder and tomatoes can sometimes leave a slight orange tint. To minimize this, don't let the chili sit in the trays at room temperature for hours - fill them once the chili has cooled down and get them straight into the freezer. If staining does happen, bake the empty, clean trays in the oven at 350°F for 20–30 minutes to burn off the trapped oils, or place them in direct sunlight for a few hours. Check out our cleaning guide for more information.
Can I double this recipe to fill more trays?
Absolutely. This recipe scales perfectly. If you want to fill four of your 1-cup trays (or two 1-cup trays and two 2-cup trays for larger portions), simply double all the ingredients exactly. Just ensure your Dutch oven or stockpot is large enough (at least 6 quarts) to handle the volume without spilling over during the simmer.
Is this chili vegan?
Yes, this recipe is 100% vegan as written. To keep it entirely plant-based, garnish your bowl with fresh avocado, lime juice, cilantro, or dairy-free sour cream. If you aren't vegan, feel free to add shredded cheddar cheese or sour cream!


)






We would love to hear your ideas or better yet, post a photo of your cubes organized in our Freezer Meals & Recipes Facebook Group!